Installation
Tiny Tracer is a PIN tool, it means in order to run it you need Intel PIN platform.
Intel PIN is available for free here. PIN's license does not allow for distribution of the tools in a compiled form, that's why you need to compile them from the sources.
To compile Tiny Tracer, you need:
- Pin: a version relevant to the particular release (the last tested was 4.2, LLVM clang-cl)
- MSYS2
clang-cl- Optional: Visual Studio (minimum 2019)
You can get clang-cl in one of two ways:
-
With Visual Studio: Install the C++ Clang tools for Windows component via the Visual Studio Installer. The compiler will be at:
C:\Program Files\Microsoft Visual Studio\20xx\<edition>\VC\Tools\Llvm\x64\bin\clang-cl.exe -
Without Visual Studio: Download and install the standalone LLVM package from LLVM GitHub releases (look for
LLVM-<version>-win64.exe). The compiler will be at:C:\Program Files\LLVM\bin\clang-cl.exe
Important
If you need to build with PIN < 4.0, use the older versions of TinyTracer (< 4.0) that can be found in the releases, and follow the Legacy Build instructions.
Prerequisites:
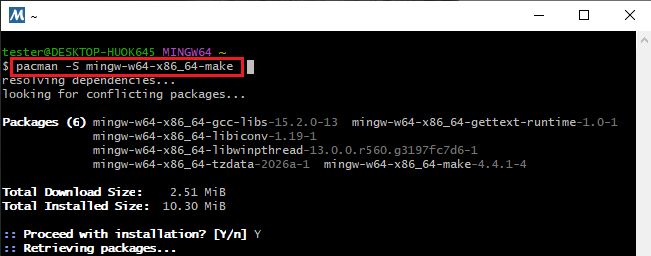
- Install the
mingw-w64-x86_64-makepackage in MSYS2:pacman -S mingw-w64-x86_64-make
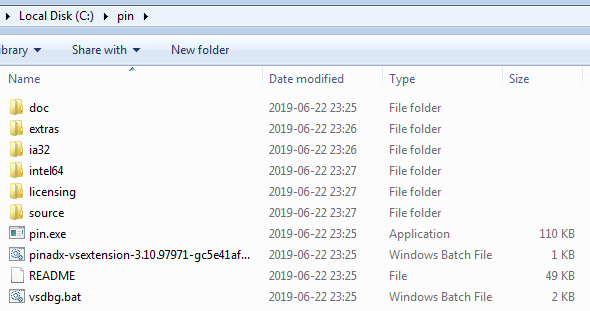
- Download the required version of the PIN platform and unpack it to your destination directory. The recommended path is
C:\pin:
You can use any path of your choice, just remember that it will cause you to have some additional work editing some paths during installation.
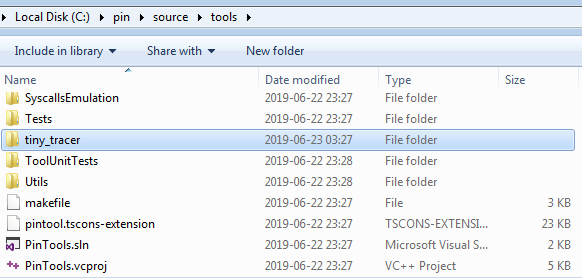
- Clone the tool repo into
\source\toolsinside your Pin root directory. For the default configuration to work, the root directory of TinyTracer should be:tiny_tracer.
Command line build:
-
Open the MSYS2 MINGW64 shell and navigate to the project:
cd /c/pin/source/tools/tiny_tracer -
Make sure
clang-clis on your PATH:# If installed via Visual Studio: export PATH="/c/Program Files/Microsoft Visual Studio/2022/Community/VC/Tools/Llvm/x64/bin:$PATH" # If installed standalone: export PATH="/c/Program Files/LLVM/bin:$PATH" -
Build:
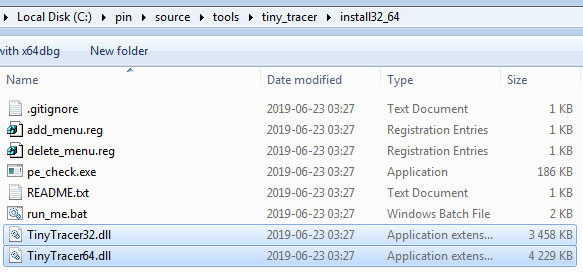
bash make_mingw.sh
The script automatically builds both version of the tool: 32 and 64-bit, and copies them into the installation directory: install32_64 under the desired names: TinyTracer32.dll and TinyTracer64.dll.
If you compile them on your own, without using the script, you must copy the binaries manually.
Using Visual Studio as IDE (optional):
Open the tiny_tracer folder via File -> Open -> Folder. The included CppProperties.json and tasks.vs.json provide IntelliSense and build integration. The build still goes through the makefile - Visual Studio is used only as an editor.
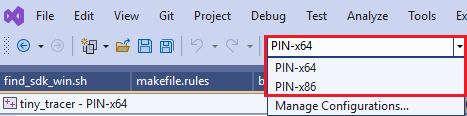
First, select the version that you want to build:
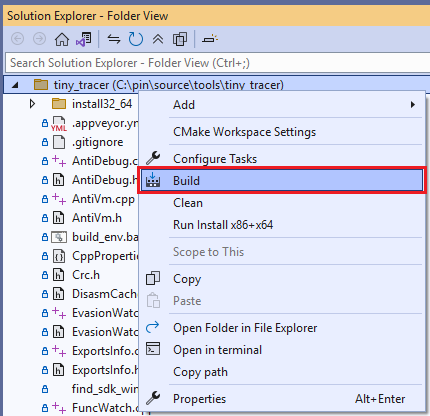
Run the build from the context menu at the root of the project:
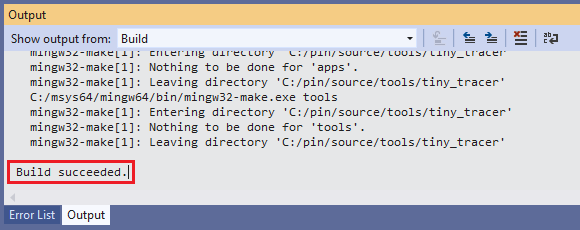
If the build was successful you will see the information about it in the "Output":
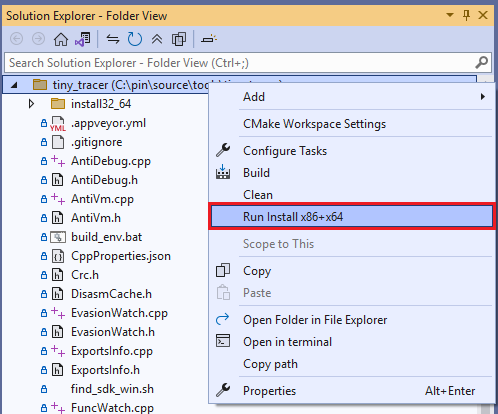
Once you built both 32 and 64-bit version, run the installation script to copy the DLLs into the install32_64 directory:
If the installation was successful, you will see the information about it in the "Output":

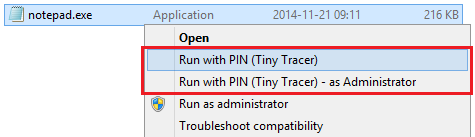
The TinyTracer can be added to the context menu, so that you can trace conveniently any executable of your choice.
If your PIN platform is in C:\pin, you don't have to make any changes in the scripts.
Go to the directory install32_64, where the installation toolkit is located.
If you had the TinyTracer already installed, make sure that you remove the previous installation by running delete_menu.reg before you continue.
Then, read the README.md, to confirm that all the paths are set valid. If everything is OK, you can run the add_menu.reg in order to add your PIN tracer to the context menu.
As a result you should see the additional option Run with PIN (Tiny Tracer):
If the setup was correct, running the executable with PIN will cause a similar info to show up:
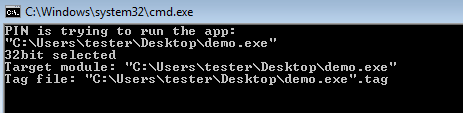
As the execution progress, the log will be saved in a file with a .tag extension.
For viewing the log in real-time I recommend Baretail.
Follow the configuration instructions in order to enable/disable needed features.
Running the application via Pin is possible with the help of the installed menu. However, sometimes we may need to attach to already running application. It can be done with the help of the script pin_attach.bat.
The script should be run from a commandline, and provided two parameters:
- a path to the module (within the given process) that we want to trace
- a target PID
Example:
C:\pin\source\tools\tiny_tracer\install32_64>pin_attach.bat "C:\Users\tester\Desktop\test_app.exe" 8924To compile Tiny Tracer, you need:
- Pin : a version relevant to the particular release (the last tested was 4.2)
-
g++,make
Once you downloaded the PIN platform, you need to unpack it to your destination directory. The recommended path is $HOME/pin.
cd $HOME/pin
~/pin$ ls
doc  extras  ia32  intel64  licensing  pin  pin.sig  README  source
Once you have your PIN unpacked, you need to clone/copy the sources of tiny tracer into /source/tools. For the default configuration to work, the root directory of TinyTracer should be: tiny_tracer.
~/pin/source/tools/tiny_tracer$ ls
FuncWatch.cpp  makefile.rules  move_dlls.bat    Settings.cpp            TinyTracer.vcxproj  Util.h
FuncWatch.h    make_linux.sh   ProcessInfo.cpp  Settings.h              TraceLog.cpp
install32_64   ModuleInfo.cpp  ProcessInfo.h    TinyTracer.cpp          TraceLog.h
makefile       ModuleInfo.h    README.md        TinyTracer.old.vcxproj  Util.cpp
In order to automatically build both 32 and 64 bit version, and place them in the required directory (install32_64 ), you can use the script make_linux.sh:
~/pin/source/tools/tiny_tracer$ ./make_linux.sh If the compilation was successful, two output directories have been created: obj-intel64 and obj-ia32. Each of them should contain TinyTracer.so. The script will automatically copy each version of TinyTracer into install32_64 directory, under the names, appropriately, TinyTracer32.so and TinyTracer64.so.
If everything went fine, the script will finish its execution with printing:
[+] 64 bit build ok.
[+] 64 bit install ok.
[+] 32 bit build ok.
[+] 32 bit install ok.Assuming that you built TinyTracer with make_linux.sh and you have both components in place, now you can trace applications using tiny_runner.sh. If you didn't change the recommended path, this script does not require any modifications. Otherwise you need to edit the paths within a script accordingly.
The script contains absolute paths to all the components, so it can be copied to any directories of your choice.
In order to make PIN tracing available from any directory (without the need of copying the script), you can add a symbolic link to your local bin directory:
ln -s $HOME/pin/source/tools/tiny_tracer/install32_64/tiny_runner.sh ~/bin/tiny_runner.shOptionally, you can also create a link to the directory with tiny_tracer configuration, to have an easy access to them. For example:
ln -s $HOME/pin/source/tools/tiny_tracer/install32_64/ $HOME/Desktop/install32_64Example of tracing:
~/Desktop/pin_tests$ tiny_runner.sh ./demoLinux runner for Tiny Tracer
Usage: <target_app> [target_module*]
*-optional; default: target app's main module
Traced App: ./demo
Traced Module Name: demo
The app is 64 bit.
Watch 5 functions
Watch 0 syscalls
===============================================
This application is instrumented by TinyTracer v.2.2
Tracing module: demo
See file ./demo.tag for analysis results
===============================================
Hello World!
As the execution progress, the log will be saved in a file with a .tag extension.
You can enable/disable features by editing TinyTracer.ini located in the install32_64 directory. Please follow the configuration details described in this Wiki.